How can I embed Spoki, so the WhatsApp Chat in the contact detail page of my software?
How can I let my clients to request a WhatsApp template directly form my management software?
Solve these needs, and more, by embedding Spoki into your own software!

Functionalities #
Here’s what you can embed Spoki with the iframe:
- Iframe embedding. Allow your customers to use Spoki features without leaving your management system.
- Auto-login via token. No need to provide Spoki credentials to your users, you can authenticate the associated service user before showing them the iframe.
- Hide Spoki branding. The Spoki logo is not visible in the iframe.
- Multi-Session. Simultaneously use Spoki in different tabs with different sessions.
- Prevent navigation. In iframe the navigation bar is not visible, in this way you can limit the usage to a specific page.
- Get notified when:
- Unread chats changed
- The list of chats in the Chats Page changed
- The list of messages in the Chat Detail Page changed
How To #
To embed the Spoki iframe you need to perform the following steps:
- Request the Api Key
- Generate the Private Token
- Embed the iframe
- Subscribe to iFrame Events
- Obtain the Api Key Approval, then enjoy 🎉
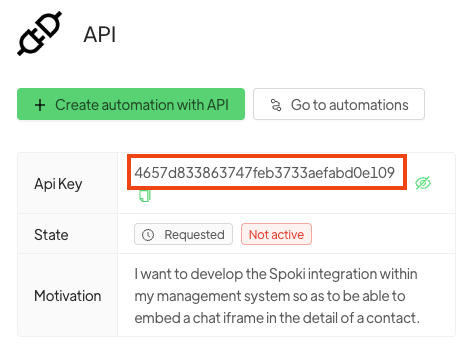
1. Request the Api Key #
- Go to Integrations / API / Request Api Key

- Insert the motivation and click on “Request Api Key”
Eg. “I want to develop the Spoki integration within my management system so as to be able to embed a chat iframe in the detail of a contact.”

- Save the generated Api Key. You will not be able to use the API until it is approved, you will receive an email regarding the outcome of the request within a maximum of 48h.
2. Generate the Private Token #
The Private Token is associated to a specific user of your account.
You can obtain a Private Token for:
- Service User – recommended
- Your own user
- Asking to other users to login and give it to you – not recommended, use Service Users instead
To obtain the Private Token follow these steps:
- Go to Users & Roles / Add
- Select the role, select “Service user” as user type, insert the name, then click “Add“

- Click on the key icon on the right of the service user
- Click on “Generate new Private Key“

- Save the email and the Private Key.
IMPORTANT: Make sure to save it, you won’t be able to access it again. Keep the key protected, anyone who has it can act for you. If so, regenerate the key.

3. Embed the iframe #
ATTENTION: you will not be authorized to use this API until you have an Approved API Key!
Yes, I know you’ve been itching to do this… it’s time to code! 👨💻
Here’s how it works:
- In your HTML page insert an empty div for the Spoki embedding
    <body>
      ...
<div id="spoki-embedding"></div>- Insert the css style in the head
      ...
      <style>
        #spoki-embedding iframe {
          position: fixed;
          bottom: 10px;
          right: 10px;
          height: 600px;
          width: 450px;
          border: 2px solid #cccccc;
          border-radius: 8px;
        }
      </style>
</head>- Before the end of the body insert this script that allows you to make the auth using the Api Key and Private Key, then it will insert the iframe inside the div. The user will be auto-logged in and will go to the page slug specified.
      ...
      <script type="application/javascript">
        // Init Spoki iFrame, you can open every Spoki page you need
  function initSpokiIframe() {
    const headers = new Headers();
    headers.append("Content-Type", "application/json");
    headers.append("X-Spoki-Api-Key", "{{Api-Key}}");
    const body = JSON.stringify({
      email: "{{Email}}",
      private_key: "{{Private-Key}}"
    });
    const requestOptions = {
      method: "POST",
      headers,
      body,
      redirect: "follow"
    };
    fetch("https://app.spoki.it/api/1/auth/get_authentication_token/", requestOptions)
      .then(response => response.json())
      .then(({ token, uid }) => {
        // the slug of the Spoki page you want to open
        const pageSlug = "chats";

        const iframeParent = document.getElementById("spoki-embedding");
        const iframeEl = document.createElement("iframe");
        iframeEl.setAttribute("frameborder", "0");
        iframeEl.setAttribute("src", `https://spoki.app/${pageSlug}?auth_token=${token}&auth_uid=${uid}&language=en`);
        iframeParent.appendChild(iframeEl);
      })
      .catch(error => console.log("Spoki error", error));
  }

        // Call on startup
        (initSpokiIframe)();
      </script>
</body>- You can set as page slug all the Spoki routes you want, the most important are:
- Chat list: “chats“
- Chat detail: “chats/:uuid” (you can get the chat_link using the Contacts Api).
You can concatenate to the src url the query params as follow:
– “&can_view_chat_list=false” => hide the back button to prevent the access to the chats page.
– “&can_reply_in_chat=false” => hide chat footer to prevent the reply from the iFrame
– “&can_send_paypal_in_chat=false” => hide the PayPal tab in the chat footer
- Templates: “templates“
- If you need to open the iFrame in a specific language you can pass as param to the src of the iFrame the language parameter (supported values are it, en, es)
Want to know more about the Get Authentication Token Api? Check the Api Documentation
4. Subscribe to iFrame Events #
With Spoki you can subscribe to the iFrame Events:
- Unread chats changed (pageSlug: works on every page)
- eventType: hasUnreadChatsChanged
- data: { hasUnreadChats: boolean }
- The list of chats in the Chats Page changed (pageSlug: chats)
- eventType: chatsChanged
- data: { chats: Chat[]; hasFilters: boolean; page: number }
- The list of messages in the Chat Detail Page changed (pageSlug: chats/:uuid)
- data: { chat: Chat; page: number; messages: Message[] }
...
<script type="application/javascript">
  function initSpokiIframe() {
    ...
      .then(({ token, uid }) => {
        // Call it if you need to subscribe to Spoki events
        subscribeToSpoki();
        ...
      })
    ...
  }

  // Subscribe to the Spoki iFrame to get notified about events
  function subscribeToSpoki() {
    window.addEventListener("message", (event) => {
        if (event.origin !== "https://spoki.app") return;
        const { eventType, data } = event.data;
        switch (eventType) {
          case "hasUnreadChatsChanged":
            /** Unread chats changed (pageSlug: works on every page)
             * hasUnreadChats: boolean
             */
            console.log("Spoki", eventType, data);
            break;
          case "chatsChanged":
            /** The list of chats in the Chats Page changed (pageSlug: chats)
             * chats: Chat[]
             * hasFilters: boolean
             * page: number
             */
            console.log("Spoki", eventType, data);
            break;
          case "chatMessagesChanged":
            /** The list of messages in the Chat Detail Page changed (pageSlug: chats/:uuid)
             * chat: Chat
             * page: number
             * messages: Message[]
             */
            console.log("Spoki", eventType, data);
            break;
          default:
            console.log("Spoki", "Unhandled message event type", eventType, data);
        }
      },
      false
    );
      ...
</script>
5. Obtain the Api Key Approval, then enjoy 🎉 #
Well done! Everything is ready to let your clients use Spoki from your own web software.
You just have to wait for the Api Key approval.
Thank you for your time.
Enjoy Spoki 🎉


